Jewelry Photography Tips
Jewelry Photography Tips: Is the cost of hiring a photographer too high for you? Are you looking to learn commercial photography? After all, photography is essential for the success of any business. Jewelry photography is no exception.
Some believe that jewelry photography is more difficult than other items, such as clothing or furniture. That is true, but if you know the tools and tips for jewelry photography, you will understand that taking beautiful photos is not impossible without hiring a professional photographer. If you are in the jewelry design or sales business, read this article.
Equipment Required for Jewelry Photography
Great jewelry photography does not require buying advanced equipment. With just a few items below, you can take beautiful product images.
Camera
Contrary to popular belief, jewelry photography does not require a high-quality lens and camera. Even novice sellers can take photos with an Android phone or iPhone. To begin with, use any camera you have, whether it’s a camera, digital camera, or phone.
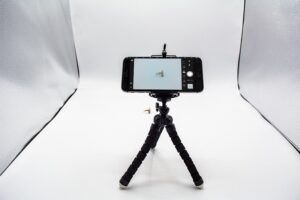
Tripod
We usually shake the camera a lot while taking photos. Use a tripod to prevent camera shake. Tripods keep the camera steady so you can easily adjust the aperture. You can get a tripod for your phone or camera for as little as 100,000 Tomans.
Table
You don’t need to buy a fancy or expensive table. A folding square table between 50 and 70 centimeters wide will suffice.
Foam sheets
When photographing products, there is always a shadow on one side, which makes it challenging. To create soft light, you can place a white foam sheet on one side to reflect the light towards the shadow.
Tape or clamps
You will need clamps or tape to hold the foam sheets on the table.
How to Photograph Jewelry
After preparing the above tools, you should consider the following when photographing jewelry.
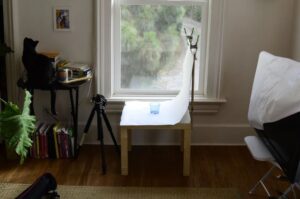
Arrange your desk
Where in your home do you want to open your “photography studio”? If you have a window with good natural light, place the desk to the left or right of it at a 90-degree angle.
Empty the object’s background or place a white paper on it. You can use tape to stick the paper to the wall. The camera and tripod should be facing the jewelry and the background.
Consider the lighting
You won’t need artificial lighting if the room is nice and bright with natural light. If not, you should place the artificial light sources at a 45-degree angle to the product.
If you see a shadow behind the jewelry when photographing jewelry, move the jewelry closer to the camera.
Style your jewelry
If you’re new to jewelry photography, start with a white background. Of course, you can change the background color to your liking.
You can place your jewelry on the following objects to achieve convincing images:
Bust, stand, or ring holder
Plain backgrounds
Marble backgrounds
Group shots with other accessories
The style of your photography will depend on how you sell your items. Although there are many ways to do this, start simple with your gold photography and then explore different styles over time.
Prepare your jewelry
Before you start shooting, clean and polish your jewelry. With the right lighting and a professional camera, even the smallest details will be visible.
Clean your jewelry every time you hold it in your hand. After you’ve polished it, could you place it in the center of your shot? You can also leave some space to remove your white paper later. Wearing cotton gloves is a good way to keep your jewelry shiny, save time, and avoid re-shooting.
Adjust your camera
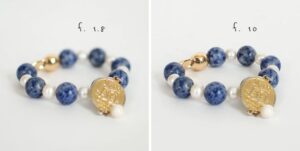
Your camera settings will significantly affect the final quality of your photos. Instead of focusing on one area, take at least one photo with the entire piece focused. If you can set your camera manually, make sure your aperture is set to f/10 or higher, and consider a low ISO, like ISO 100.
A high aperture and low ISO will help you get sharp, detailed photos. This is important for building trust with your clients!
Jewelry Photography Tips
Look at the photos. Does your jewelry stand out the way you want it to? If not, manually adjust the settings until it looks right.
Take a photo
Time to shoot! As you work, consider the position of the camera. Hold it at an angle, pointing down towards the jewelry. Position the light source or sources slightly above and towards the product.
Set all the light sources to the same level to get a fully lit frame. Otherwise, you may end up with dark and bright spots.
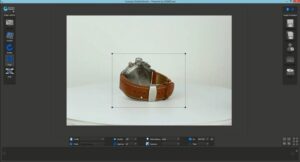
Retouching and finalizing
Retouching is an essential step in getting your photo to the final level. If you’re new to photo editing, consider hiring a professional. You can use freelance platforms to commission photo editing. If you want to learn on your own, there are plenty of free resources to help you out.
Jewelry Photography Tips
Jewelry Photography Tips
There’s no one-size-fits-all way to photograph jewelry, but there are some rules to help you out.
Choose plain backgrounds
It might be tempting to use a bright background. But in the end, your product will get lost in the crowd and be harder for visitors to see.
It’s best to work with a plain white or black background. Just remember that black backgrounds are not accepted in some online stores, so white is safer.
White is visually better and makes your work easier. Creating a white background is easy. It also makes editing any issues in the retouching process easier.

Take photos with a consistent theme.
Follow the above rules regarding lighting, background, equipment placement, and camera settings. Taking photos in different or busy styles may distract your visitors. Choosing a consistent style and background will give your brand an identity. The more consistent your images are, the easier it will be for customers to understand what your brand is about. Plus, your website and page will look much cleaner and more professional.
Mannequin Busts
Most jewelry stores use mannequin busts for necklaces, a great way to showcase the beauty of your products.
Most stores have black busts because they highlight the jewelry and give it a sense of elegance. However, as mentioned above, photographing your product in white makes it look much more beautiful, and jewelry is no exception. So, if you only have a black jewelry bust, cover it with a white cloth and then take a photo. You can always remove the background later.
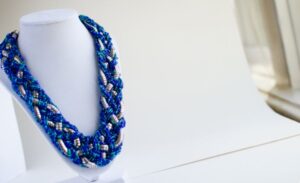
If you don’t have a mannequin, take a piece of cardboard, cover it with white paper, and pin or glue the end of your necklace to the back. You can always adjust the length of the chain.
Work with models
Working with models can be expensive, but it pays off. If possible, enlist the help of friends. With the help of a live model or mannequin, show how to use the products and show your brand’s image to the ideal customer.
Australian brand Bowerhaus works with different models each season. Each model is selected based on the look and style of the jewelry collection.
Try GIF files
Animated GIFs are not very common in online stores. Of course, they are not as large as video, but they are great.
You don’t necessarily want all of your images to move, but having one or two moving pictures on your product page can help grab buyers’ attention and show them how the product is moving.
Common Mistakes When Shooting Jewelry

Not paying attention to detail when shooting jewelry can ruin everything. Watch out for the following mistakes:
Not being well-prepared
Prepare your equipment before shooting to save time and spend much less editing and retouching your photos.
Poor lighting
If you don’t have great or consistent lighting, your online store items will look very different in color. Use a specific lighting pattern or location to keep everything looking consistent.
If your lighting isn’t proper, it will reflect poorly on your jewelry. This will prevent shoppers from seeing the details while shopping online and make your images look amateur.
Incorrect Color
Represent the color of your products as accurately as possible. If a buyer is looking for a piece of silver jewelry and likes the product photo but later discovers that the product is actually gold, they will have a terrible experience.
Don’t expect buyers to read the product description. With the popularity of Instagram and Pinterest, buyers rely on photos to purchase. If you can accurately represent the color, you will reduce the likelihood of returns.
Image and Product Size
Jewelry (and earrings, in particular) vary in size, and you can’t display everything on a large scale in your store. Some stud earrings are so small that they are barely visible.
So keep the image size consistent so everything is easily visible in your online store.
Contrasting Backgrounds
Consistency is a key element in jewelry photography. Shoot with a consistent background. Different backgrounds make it difficult for buyers to see your store.
Don’t settle for one image.
Take photos from every angle to see the details, clasps, chains, and everything else. Many brands don’t provide enough images. If you only provide one photo, it becomes difficult to visualize the product in the buyer’s mind.
The more photos you provide, the fewer questions customers will have and the higher the conversion rate of visitors to customers!
Finally
Photographing jewelry and editing photos is not difficult and requires some practice. If you don’t have the time to take pictures, you can outsource this task to professional freelance photographers in Karlansar by ordering jewelry photography. Also, if you are a jewelry seller but don’t have a website, you can get help from freelance web designers in Karlansar to design a store website.
What is Midjourney? How to use it?
What is CPC?
Mouse Settings Tutorial in Windows 10
What is an accelerator
What is Anchor Text? Its Importance in SEO