How to Improve Logo Quality? Photoshop Video Tutorial
You see logos almost everywhere during the day. From the beginning of the day, if you take a can of cheese out of the refrigerator, the manufacturer’s brand logo is visible on its door. As you drive to your workplace, the streets are full of advertisements, each displaying a specific logo. From this multitude of logos and their significant number, we can understand the importance of logos and their design in today’s life. Branding and business growth and development use logo design in its first steps; a graphic design is better than anything else in the mind and can be influential. Now, if you are engaged in logo design and graphic work, you may need to improve the quality of the logo under certain circumstances. For this reason, in this article, we will discuss ways to improve the quality of the logo. Stay with us.
Improving Logo Quality
Suppose you do not have proper access to a logo and repeatedly enlarge it to obtain a logo of suitable dimensions. In that case, the quality of the logo will be severely reduced. When you do this excessive enlargement, the small squares that together form the logo’s shape become enlarged and are visible as the components of the logo. Images that appear in this form are called “pixelated images” and have poor quality and must be repaired. Repairing these images is possible using various tools; of course, the final result will not be like the high-quality logo image from the beginning, but its pixelation will be significantly reduced. In general, you can improve the quality of the logo with two methods, which we have mentioned below.

Increasing the quality of a logo using Photoshop
Photoshop software is often used to edit images, but it can also be used to improve the quality of a logo. To increase the quality of a logo with Photoshop software, follow the following methods.
Method 1:
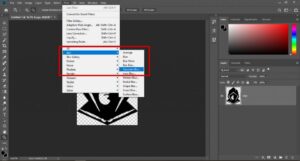
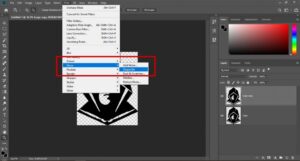
First, this method opens the desired logo image in the Photoshop program. Then, select the Filter option from the program’s top menu, then Blur, and then Gaussian Blur. You can change and adjust the degree to the most appropriate level. Then, confirm it by clicking Ok.
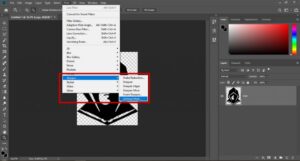
In the next step, you need to go to the Filter menu, select the Sharpen option, and then Unsharp Mask.
Move the slider again to reach the desired level. After this step, the image’s pixelated state will be resolved, and you can apply other corrections to it.

Second Method:
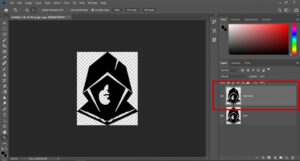
Another way to increase the logo’s quality in Photoshop is to add another layer on top of this layer. If you place the second layer with soft light, you can eliminate the pixels and have a high-quality logo. To do this, open the logo in Photoshop and create a duplicate image layer.
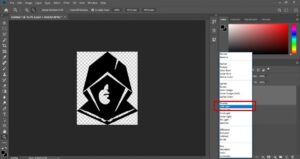
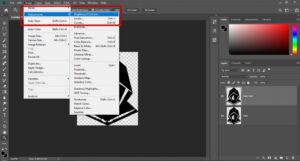
After you select and highlight the second layer, select Blending Options from the top menu and then select Soft Light.
After applying this, you should go to the Filter menu, select the Noise option, and then select the Despeckle option.
In the next step, select the Image option from the top menu and then Adjustments. Now, by choosing the Brightness/Contrast option, you can find the best range for a quality logo. You can even combine these two methods to improve the result.
Increasing the quality of the logo using online tools
In addition to Photoshop software, various online tools and sites provide the best services in photo editing. These sites are positive because they allow users to use photo editing features without downloading the program or having special knowledge and information. We will introduce three prominent websites in this field.
Photopea website:
This free and famous website is actually an online Photoshop, with an environment and features very similar to Photoshop. According to the instructions given above, you can also increase the quality of your logo on this site and remove it from being pixelated.
Fotor website:
To eliminate the pixelated state of the photo and logo on the Fotor website, you must upload the logo photo to the website, select the Effect option, and then select Pixelated from the left menu. Now, moving the slider to the left will make the pixels smaller. You can also use the Beauty and Smoothing sections to reduce pixels.
Pixenate website:
This website can also be a good choice for removing large pixels from images. After uploading the photo to the site, you need to select Smooth photo from the left menu. Although the effectiveness of this option depends on the original quality of the image, it can generally increase the quality of logos and pixelated images.
Using any of these solutions can be effective for a variety of logos. The choice depends on you and your circumstances. If you do not have Photoshop software, you can use online tools such as the three websites introduced. On the other hand, the improvement in image quality using these techniques also depends on the original quality and resolution of the image, and the higher the original quality of the image, the better the repair of pixelated photos will be.
Conclusion
In this article, we have introduced several solutions to improve the quality of logos and introduced you to the methods of increasing the quality of logos. Now, you can use Photoshop software or sites on the Internet to repair poor-quality logos and convert them into high-quality logos. We hope you have benefited from this article.