How do you permanently attach subtitles to a movie (hardsub)?
Are you a fan of watching movies with subtitles? Do you always spend a lot of time finding subtitles and activating them? In this article, you will learn different ways to attach subtitles to a movie permanently.
Permanently attaching subtitles to a movie is also known as rigid sub, hardcode subtitles, or “burned-in or forced subtitles.” In this method, the subtitles become part of the video and are visible without adding a separate subtitle file.
Why should we attach subtitles to a movie permanently?
In the video creation process, there are many reasons to attach subtitles to videos permanently:
- The player has to decode and encode the subtitles on the videos while playing the movie, which puts pressure on the CPU. As a result, there may be some problems when watching movies.
- Some websites, desktops, mobile devices, and TV players are incompatible with soft-code subtitles or do not display them correctly. You may have encountered problems such as subtitles being displayed incorrectly or not at all. Also, if you want to publish a video with subtitles on social networks such as Instagram or Telegram, in that case, you have to attach the subtitles to it as hard subtitles because they do not support separate subtitles.

These problems are not an issue for permanently attached subtitles that do not require subtitle plugins. So, if you want to freely enjoy watching videos with subtitles on your computer, mobile, TV, and anywhere, attach subtitles to the video wholly and permanently.
How can you permanently add subtitles to MP4, MKV, and other format videos? Continue reading this article to learn three ways to use VideoProc Vlogger, VLC media player and Handbrake to paste SRT/ASS/SSA subtitles to videos permanently.
How do you permanently attach subtitles to a movie?
Permanently Paste Subtitles with VideoProc Vlogger
Some video editing software can help us easily paste subtitles to videos. Here, we recommend VideoProc Vlogger, which can easily add and hardcode subtitles to MP4/MKV/AVI/MOV videos.
Permanently Paste Subtitles Without Losing Video Quality
- Easy to Use—With just one click, you can permanently paste subtitles to MP4, AVI, MOV, and other popular video files.
- Instant Preview: Scroll through the timeline and preview the subtitles in real time.
- Customizable and instant preview: Edit the subtitles’ font, color, position, and size as needed.
- High-quality engine: After pasting the subtitles, the videos are viewable without losing quality.
- Fast–Paste subtitles to MP4 and other video files in minutes, thanks to GPU-level 3 technology.
- Advanced editing features include splitting, adding a watermark, changing speed, cutting motion, adding music, and editing frame by frame.
5 steps to paste subtitles permanently to any video
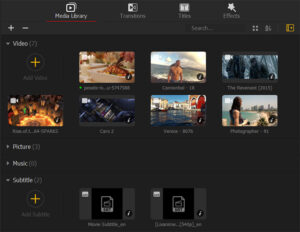
Step 1: Download and install VideoProc Vlogger software on your Windows or Mac system. Open the software and start a new project. Add media files, including videos, images, music, and subtitle file(s) to the Media Library.
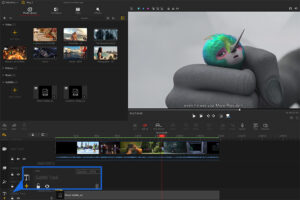
Step 2: Drag the original video to the Video Track and edit if necessary.
Step 3: Drag the subtitle file to the Subtitle Track area of the timeline. You can drag the File to the left or right to synchronize it with the video.
Step 4: Click Export. In the opened window, you can set the file name, destination to save the File, output format, resolution, video quality, etc.
Step 5: Click the Start button to activate the subtitle encoding. After a while, you will receive the final video file with the subtitles permanently attached.
How do you permanently attach subtitles to a movie?
Permanently Attach Subtitles with Handbrake
Before the release of Handbrake 1.2.3, you could only attach SRT subtitle files. With the release of the latest version of this software, you can attach SRT, ASS and SSA subtitles permanently to MKV and MP4 videos. However, changing the subtitle color, location, and size is still impossible. Anyway, let’s take a look at how to use it to add subtitles to a video:
1. Run the latest version of Handbrake
Open Handbrake and click on About Handbrake.
Select Update> Check for Update. Handbrake will start checking for an updated and current version of the program. If a new version is available, Handbrake will prompt you to download and install it on your system. Once you have downloaded the latest version, run it.

2. Add video files to Handbrake
Click File to add the video clip to which you want subtitles. You can also drag it to the right to load it directly into the program.
3. Select the required video format
After Handbrake successfully loads the source video, you will be taken to the main interface. Click Preset and select the required video profile. Among them is an option with the highest resolution, 1080p (Full HD). If you want an ultra-high resolution result, click Save New Preset to create a custom preset.
Go to the Summary section and open the Format tab to select the desired output formats from MP4 and MKV. Do not select WebM, as it does not support hardcoded subtitles. If you need MOV, AVI, and other file formats, you are better off working with VideoProc Vlogger, which is much more compatible.
If you are a beginner, you can ignore the dimensions, videos, audio, and filter settings. However, if you need better control over the output file’s size, quality, and processing speed, you should check all the settings carefully.
4. Add subtitle files
To send SRT, ASS, or SSA subtitle files to Handbrake, click Subtitles > Import subtitles. Check the burn-in box.
5. Choose the output file location
Click Browse to select the destination folder and create a new file name. Click Save.

6. Start adding subtitles
Click the green Start Codec option in the top menu bar. Depending on the format, time, and quality of the video, it may take several minutes to several hours to paste the subtitles into the video.
Permanently Paste Subtitles with VLC Media Player
Using VLC Media Player to paste subtitles to videos permanently can be difficult for beginners. If you are uncomfortable with it or do not want to install any separate software, continue reading this guide.
1. Open VLC media player.
Click on the VLC icon on your desktop to launch it.
2. Add subtitles and video files.
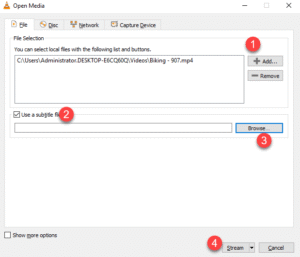
Go to Media and select Stream. This will take you to the Open Media panel. First, click Add+ to import the subtitle file. Then, click the Use a subtitle file box to add the prepared subtitle. Then click on Stream and click Next.
3. Select the Destination to Stream to.
Click on Add to reach the Destination Setup panel. Click Browse to select the desired output file folder and set the file name. After making the appropriate settings, click Next.
4. Select the appropriate profile.
Now that you are in the Stream Output tab, your first task is to enable the Active Transcoding option.
After clicking on the Profile box, many video and audio codecs are available. However, we recommend using +MP3(MP4) H.264 to avoid problems like audio loss, a/v mismatch, wrong images, etc.
5. Edit the selected profile.
To enter the Edit Profile tab, click on the gray toolbox icon. You can see Encapsulation, Video Codec, Audio Codec, and Subtitles there. Let’s go through them one by one:
How do you permanently attach subtitles to a movie?
• Encapsulation
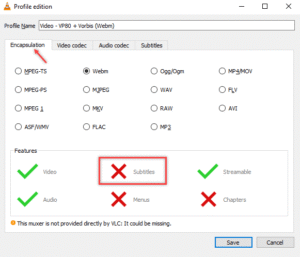
Encapsulation should be checked in the same sequence as the Profile Name.
Pay attention to the Subtitles option in the Feature tab. If the Subtitle icon is crossed out with a red cross, the selected formats do not allow you to add hardcoded subtitles. You need to go back to the previous step to choose another profile.
• Video Codec and Audio Codec
Beginners are advised to leave the parameters of these two tabs at their defaults, as inappropriate bitrate, resolution, or frame rate settings may cause terrible quality loss, slow transcoding speed, and other strange issues.
• Subtitles
This is the most straightforward but most crucial step. Check the Subtitles, enable Overlay subtitles on the video, and then click Save.
VLC media player will start encoding the subtitles.
Click Next. Now, VLC will start permanently pasting subtitles to your videos. Depending on the size and format of the original and output files, this process can take from a few minutes to a few hours. Remember not to close the program before everything is finished.

How to change the appearance of subtitles using VLC?
With VLC media player, you can change subtitle properties, including font, color, position, size, and other information. Note that the subtitles are not previewable, so you may need to try several times to get the look you want.
1. Click Tools > Preferences, scroll to the bottom left of the interface, and click All.
2. Scroll down the settings list and find Subtitles/OSD. Click on it and select Text renderer.
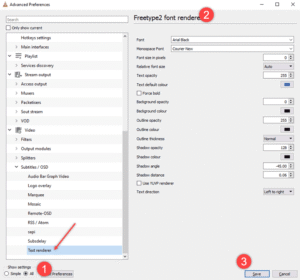
3. You will be given many options to adjust the appearance of the subtitles in the video.
4. After making the required settings, click Save.
Finally
So far, you have learned three ways to permanently paste subtitles and enjoy movies and videos on different devices and players. The VideoProc Vlogger software allows you to paste subtitles to any video for free, easily. However, VLC media player and Handbrake are suitable options for this task. Don’t forget that if you need to translate the subtitles of your favorite movies or clips, you can order subtitle translation on the Karlenser site so that expert translators can do it for you at the best cost and time.
Source
https://www.videoproc.com/video-process/add-hardcode-subtitles.htm