How to Backup Your WordPress Site?
Are you worried about the security of your WordPress site? After you have chosen a beautiful theme and added your favorite WordPress plugins, the next step is to protect your WordPress site, which is one of your assets. Here, WordPress site maintenance is essential. Several things are important in this regard, one of which is free online and offline site maintenance. Below, we will teach you how to back up your WordPress site so that you can quickly restore your site data whenever you need it. The same thing you always do for your phone data or WhatsApp chats!
Backup your WordPress site with the help of a plugin or extension
Many backup plugins can be used to back up your WordPress site. These plugins are quick and easy to use. Use the following guide on the popular UpdraftPlus plugin to back up your WordPress site.
Installing and running the WordPress plugin
From your WordPress dashboard, hover over Plugins in the left-hand menu. If you have a Persian dashboard, go to Plugins in the right-hand menu. Then click Add New.
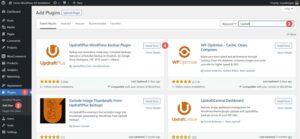
In the search bar at the top right, type Updraft. Click Install Now. After installing the plugin, the button will turn blue. Now click the blue button that says Activate.
Running Settings
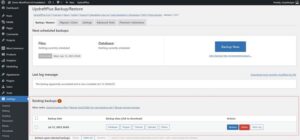
After installing UpdraftPlus, you can access the plugin by hovering over Settings from the left-hand menu. If your WordPress dashboard or dashboard is in Persian, click the Settings option on the right. Then click the UpdraftPlus Settings option. This will show you the plugin dashboard, notifications about your existing and scheduled backups, and backups.
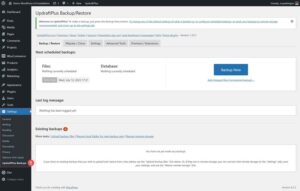
Create a new backup
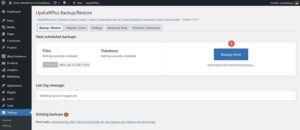
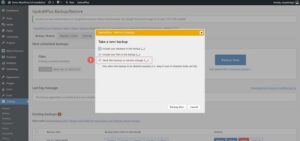
To create your first Backup, click the big blue Backup Now button.
Once you do this, a window will appear. You will be presented with four options:
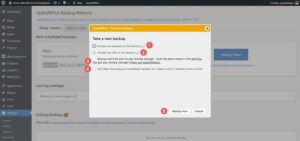
You can back up your database or files. Both options have an ellipsis in their sequence, which will give you detailed information about the database tables and folders you want to include or exclude from the Backup.
The third option will be available when you connect your cloud storage to your plugin. We will explain it more later.
Finally, you can decide whether to manually delete this download. Once you have selected the appropriate options, click the Backup Now button.
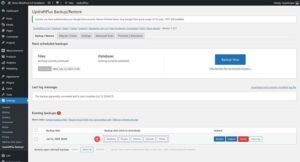
Once the Backup has been completed successfully, you will notice the new Backup in the table of available backups. When backing up your site, you can download, restore, and delete specific aspects of your Backup or view the processed report.
Automatic Backup Scheduling
Now, let’s examine automatic and scheduled backups. To do so, click on the Settings tab from the UpdraftPlus dashboard.
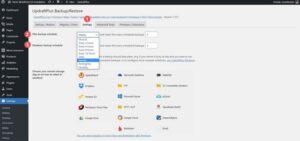
The first two options allow you to set up automatic backup schedules. You can schedule your site’s files and database hourly to monthly. Additionally, you can decide how many backups to keep on your server. You can specify the storage method your site uses from the same settings page. UpdraftPlus has many options for storing backups in the cloud. Some of the available options include:
Dropbox
Google Drive
Email and
SFTP
With the free version of UpdraftPlus, you can store your backups in a cloud or online service. However, the premium version of this plugin performs backups in multiple locations.
Let’s create a backup to Google Drive. From the list of cloud services, select the Google Drive icon. Next, click the Sign in with Google button to log in to your Google Drive account.

Then log in to your Google account.

After you have permitted UpdraftPlus to access your Google Drive account, click Allow.

Finally, you will be presented with the following page. Click the Complete Setup button to return to WordPress.

When you return to WordPress, you will see a message that your Google Drive has been successfully connected.

After connecting to your account, click the Settings tab again. Then, scroll down to the cloud account you have set up and click the Save Changes button.

When you take a backup, you can send the Backup to your Google Drive account.
Save Backups Offline
It’s also a good idea to save backups to your computer, hard drive, or flash drive. To do this, click on each of the backup folders you want to download to your cTo.
To fully back up your site, you’ll need to download your database, plugins, themes, uploads, and other folders. Now that we know how to back up online, offline, and in the cloud with a plugin, let’s see how we can do it manually.
How to Manually Backup Your WordPress Site?
To manually back up your WordPress site, the easiest way is to download a backup of your site files using your hosting provider. Most modern web hosts provide you with an online portal and file manager that you can use to manage your site files directly. The software that many hosts use is cPanel. With cPanel, you can access your databases, email accounts, and a visual file manager. Your hosting provider may also have an interface it provides its customers for file management and backups.

If you don’t have access to your files on your host or through cPanel, you can back up your site via FTP. Filezilla is a popular tool for managing your WordPress site via FTP. You can also use terminal clients like Putty and WinSCP to connect to your server and, as a last resort, back up your site.
Where to store WordPress backups?
As mentioned throughout this tutorial, there are many places to store WordPress backups. The first and easiest place is directly within WordPress. This is usually where backup plugins store your backups. However, this method can cause performance issues in the future as you take more backups, and they get larger and larger. We recommend storing your backups outside of your WordPress site in different locations. You can store them on your computer, an external hard drive, or the cloud using a third-party host or platform like Google Drive or Dropbox.
It’s important to note that having an offline backup of your site is essential. While your web host and cloud storage are great places to store your backup files, any online platform can corrupt, lose, or be unavailable at any time. Having an offsite copy of your site is a safe backup method.
How often should you back up your WordPress site?
Most web hosts these days offer free, daily backups of your site. However, depending on the complexity of your site and the processes that happen on your site, you may need to change this schedule. On average, it’s a good idea to have automatic, daily backups. This can be done through your web host or plugins like UpdraftPlus or BackupBuddy.
However, if you’re in the e-commerce or online sales space, you’ll want to increase the frequency of your backups, depending on your server load, storage limits, and number of orders. Running hourly or even minute-by-minute backups is common on large e-commerce sites! In addition to daily backups, take monthly offline backups of your website.
What should you do if your site goes down?
A site crash is a frustrating experience. First of all, you should contact your web hosting company. They will often have daily backups of your website that you can quickly restore. Second, check your online cloud storage and backup folder to see if a backup exists to fix. If restoring your website manually, you must copy over your database and file structure. If you can access your WordPress dashboard when your site goes down, you can restore one of the backups from a backup plugin if the plugin has this feature.
At Jannavita, many WordPress and web design experts can help you when your site goes down.

Best Tips and Tricks for Backing Up Your WordPress Site
Here are a few things to remember when backing up your WordPress site.
Back up your WordPress site with a plugin.
A backup plugin is the easiest way to manage and back up your WordPress site.
Test your Backup
It’s essential to test your Backup because it should work in a crisis. You can do this by restoring a backup to a local site. This is also a way to see if there are any errors in the files or steps required when backing up.
Back up your WordPress files and database.
Some backup plugins allow you to back up the database instead of the entire site. However, always take a full backup of your website regularly, especially after making changes to it. Sometimes, if your file structure changes, these changes to your file system can cause problems with database backups.

Take an External Backup
Cloud backups rely on platforms that can fail. If the worst-case scenario happens, having an offline backup will save you. It’s a good idea to take an external backup of your entire site on a monthly basis.
Use automated backups when possible.
Automated backups give you the space you need to maintain your site. Choose a backup plugin that includes this option, or ensure it’s included in your hosting plan.
Don’t store online backups in WordPress.
Since a backup is like a complete snapshot of your site, storing it on your WordPress site can eat up your storage space and cause performance issues. Try to store online backups outside of WordPress, or even better, in the cloud via a service like Google Drive or Dropbox.
Back up before and after making significant site changes
Make a full backup of your site before adding a new feature or functionality. The changes you make could cause major disruption or data loss.

Keep your backups secure.
Ensure your backups are safe from hackers, whether online or offline. Store them in password-protected folders and devices, such as USB drives, and encrypt them.
Choose a name for your backups that you’ll remember.
Most backups have an auto-generated name. Remembering the names when you recheck them weeks later is hard. Give your Backup a name that’s easy to remember. For example, “Before Menu Edit” will tell you this was taken before the menu was changed.
Finally
Learning how to back up your WordPress site is essential in the website design process. Backing up saves your site if it gets hacked so that you can restore it if something goes wrong. All in all, it’s good insurance. Plus, backing up is an essential site maintenance measure that should be done frequently.