How to Record a Laptop Screen? How to Capture and Record Video from a Monitor
Capturing a laptop screen is a key tool for documenting digital activities, video tutorials, and sharing specialized content. Today, users can professionally manage screen recording using advanced software, including free and commercial tools.
Different operating systems also offer a variety of built-in features for screen recording, which, in many cases, reduces the need for external software. Choosing the right tool depends on recording quality, output formats, post-recording editing, and user needs.
In another article, we discussed taking a screenshot of a computer screen. In this article, we will examine practical solutions and specialized tools for capturing or recording a laptop screen so that users can optimally benefit from this feature.
A Complete Guide to Recording Your Laptop Screen with the Built-in Game Bar Tool in Windows
Windows Game Bar is a powerful and integrated tool in Windows that allows users to record their screen. It is designed specifically for gamers but can also be used to create tutorials and other content.
System Requirements
Operating System:
Windows 10 (version 1903 or later) or Windows 11
Graphics Card:
DirectX 11 or later support
Enable Game Bar
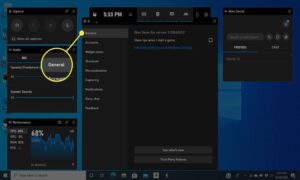
Open Settings:
Press Windows + I.
Gaming section:
Click on “Gaming”.
Enable Game Bar:
Turn on the “Enable Xbox Game Bar for things like game clips, chat, and live streaming” option.
Steps to Record
Launch the app:
Open the app or screen you want to record (best for full-screen apps)
Access Game Bar:
Enable Game Bar by pressing Windows + G and clicking “Yes.”
Start recording
How to start:
Click the Record button or use the Windows + Alt + R key combination.
Recording function:
All screen activity will be recorded.
Stop recording
Press the Stop button or use the Windows + Alt + R key combination again to stop recording.
Access recorded videos
Storage location:
Videos are saved in C:\Users\\Videos\Captures [your username] by default.
Format:
Videos are saved in MP4 format.
Tips for optimal recording
Sound quality:
Use a good microphone.
Use headphones:
To prevent echo sound.
Reduce distractions:
Close unnecessary programs and notifications.
Windows Game Bar is a powerful tool for recording videos on laptop screens. By following the steps mentioned, you can produce high-quality and professional content.
Professional use of QuickTime Player on Mac
QuickTime Player is a powerful yet simple tool for playing and recording video on the macOS operating system. This program allows users to take high-quality photos and videos from their screens without needing external software and apply advanced settings. Note that newer versions of this Windows software have stopped being released since 2016!
How to record a screen with QuickTime Player
To start recording a screen, follow the steps below:
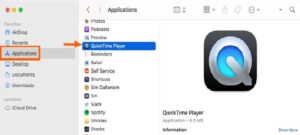
Open the program
Select the “New Screen Recording” option from the “File” menu.
Set the recording area.
Select a specific area to record with the mouse or the entire screen.
Start recording
Press the “Record” button to start recording.
Stop recording
Click the “Stop” button in the menu bar to end the recording. The video will be saved automatically.
Advanced recording settings
QuickTime Player provides users with several options to customize their recording experience:
Select audio source:
Capable of recording microphone or internal system audio.
Show mouse cursor:
Turn on or off the display of the mouse cursor during recording.
Set the output quality:
Recording video in 4K resolution and MOV format to maintain quality.
Advantages of using QuickTime Player
Using this built-in macOS tool has many advantages:
No need to install additional software
Simple and practical user interface
Ability to record audio and video simultaneously
Ability to edit video initially after recording
Full compatibility with other Apple software
QuickTime Player is a comprehensive and efficient solution for macOS screen recording and video file management. It provides various features and is of high quality, meeting the needs of professional and novice users.
A Comprehensive Guide to Using OBS Studio for Professional Recording and Live Broadcasting
OBS Studio is free and open-source recording and live broadcasting software. It is also one of the most potent and popular.
This software offers extensive features for recording and streaming high-quality video content and is used on various platforms such as YouTube and Twitch.
How to Install and Set Up OBS Studio
Download and install the software from its official website to get started. After installation, you can select the sources you want to record by going to the Sources menu. Options such as:
Display Capture (record the entire screen)
Window Capture (record a specific window)
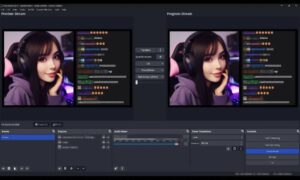
Professional settings for recording
OBS Studio allows you to customize the settings in the “Settings” section. Users can adjust the following:
Video format and quality (MP4), MKV, etc.)
Frame rate (FPS) according to needs
Audio settings, including simultaneous recording of microphone and system audio
Resolution selection up to 8K
OBS Studio benefits
High recording quality
Professional-quality video recording and full customization
Live streaming support
Simultaneous streaming on multiple platforms
Various plugins and filters
Improve audio and video quality with advanced tools.
Challenges and limitations
Requires careful initial configuration for optimal performance
High system resource consumption that may reduce laptop performance
Large recorded files that take up a lot of space
OBS Studio is an ideal solution for content creators, gamers, and online educators who need high-quality recording and streaming. With the correct configuration, this software can provide a professional and unparalleled experience.
A comprehensive and professional guide to using Camtasia to produce quality videos
Camtasia is powerful and advanced video recording and editing software known as an all-in-one solution for producing professional video content. This program combines screen recording capabilities with high-level editing tools to allow users to create videos with unparalleled quality and attractive visual effects.
Installation and Getting Started Steps
To take advantage of Camtasia’s features, purchase and install it from the official website. After installation, the video recording process is completed with just a few simple clicks:
Start recording:
Using the Record button, the recording process begins.
End recording:
The Stop button is used to save and end the video recording.
Select the recording area:
You can record the entire screen or just the desired part using the Select Area tool.
Audio Settings
Ability to select external microphone or system audio via the Audio menu.
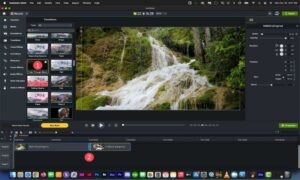
Key Video Editing Features
Camtasia is more than just a simple recording software and meets the needs of professional users by providing a wide range of editing tools:
Advanced video and audio effects:
Apply graphic filters, adjustments, and audio effects to enhance the attractiveness and quality of the output.
Add graphics and animation:
Use visual effects such as picture-in-picture (PiP), animated subtitles, and interactive markers.
Timeline editing:
Ability to cut, combine, and apply precise changes to different video parts.
Interactivity:
With the ability to add interactive links, quizzes, and navigation buttons, Camtasia provides a dynamic and user-oriented video experience.
Key Benefits of Camtasia
Excellent recording quality:
Camtasia allows you to record videos at 4K resolution and high frame rates, creating unparalleled quality for professional videos.
Wide compatibility:
The software can export in various formats, making it easy to share videos on platforms such as YouTube, Vimeo, and LMS.
User-friendly environment:
With a modern and simple user interface design, Camtasia allows quick access to advanced tools and offers an easy and efficient user experience.
Potential challenges
Relatively high cost:
As a paid software, Camtasia may seem expensive for novice users.
Requires strong hardware resources:
The optimal performance of the program depends on a powerful processor and graphics card.
The large volume of produced files:
High-quality output videos may take up significant space.
Camtasia is ideal for content creators, educators, and marketing teams looking for a comprehensive solution for recording and editing professional videos. This software’s advanced features and flexibility make it an unrivaled tool in the video content production industry.
Using the Loom program, record and share videos easily and quickly.
Loom is a free online tool that allows users to record their screen and share it easily via shareable links.
This software makes the recording and sharing process simple and fast. It does not require the installation of heavy programs and only requires the use of a browser extension.

Outstanding features of Loom
Screen recording with webcam:
With Loom, in addition to recording your screen, you can also show your image via webcam in the corner of the screen, which is very efficient for creating direct communication with your audience.
Advanced Audio Settings:
Using the Audio menu, you can record your voice or the system sound simultaneously, which helps record online meetings or audio tutorials.
Easy Sharing of Loom:
It allows you to easily share the video with others as a link after recording, making the process quick and easy.
Loom Advantages
No need to install additional software
Installing an extension in your browser allows you to record and share 1080p-quality videos.
Live Streaming Support
You can share your activities live on the Loom platform and get feedback through user comments.
Loom Disadvantages
Loom Storage Limitations:
You cannot save recorded files to your device; you can only view or delete them in your Loom account.
File Limitation:
Free accounts can only save up to 100 files for 5 minutes, and you need to upgrade to the paid version to access more features.
With these features and limitations, Loom is an excellent choice for users looking for a simple, fast tool to record and share content.
An Overview
In this article, we will introduce several specialized methods for recording laptop screens according to users’ diverse needs. These methods range from the operating system’s native capabilities for simple recording to professional tools like OBS Studio and Camtasia for high-quality recording.
Loom has also been introduced as a tool for live streaming and quick content sharing. These methods provide an unparalleled experience of recording and sharing content with high accuracy and efficiency.